Setting Up Email in a Rails 4 app with Action Mailer in development and SendGrid in production using Heroku
Here is a demo of how I created an email w/ user-mailer in rails
First off, from the Rails Guide generate a UserMailer
Then in the user_mailer.rb create a function that sends the email

Pretty simple right? Now we need to create the view. This is where you can design the email and whatever text you want to put in it. Create a file in the app/views/user_mailerfolder. The name of the file should match the name of the function you defined in the
user_mailer.rb file. Mine is welcome_email.html.erb
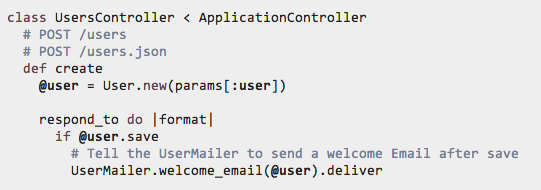
Now that we have the function to send the email, and the text of the email itself, we just need to add a line in the controller to have it send the email when we want it to.
You can call the mailer function wherever you want to send the email, in this case we can just send it when a new user signs up
Now we need to set up the config files for the email address we will use to send emails. For development, in the
config/environment/development.rb file:
Set the
config.action_mailer.default_url_options to ‘localhost:3000’ in development, or whatever port you are using to test. In production, you would set it to the url of your production app. Then set up the email smtp settings according to your email provider. I’ve shown the settings for gmail here.
So great, now we have it set up so a new user will receive an email, at least in development. Now getting this working in production can be slightly harder. But I’m going to walk through one super easy solution of how to set this up usingHeroku andSendGrid, but there are probably a million different ways to do this depending on your hosting, your email, etc.
So the first thing to do before moving to production is to protect the sensitive email sign in information that we just put in the
config/environment/development.rb. The easiest way to do this is to use environment variables, and a simple way to do that is to use the figaro gem. I wrote a quick post on how to setup environment variables with the figaro gem here, so take a minute and set that up in your app first. This will keep your email login info from getting pushed to github, in case you are using a public repository. It should then look something like this:
So, assuming you have your app pushed to heroku for production, the next thing we need to do is setup an email add-on for your heroku app. Of course you could fully create your own email solution, but if you know how to do that then you wouldn’t be reading this blog, would you? So, for a simpler solution, first you can choose one of the email related add-ons from the heroku add-ons page. I happen to use SendGrid as I think its one of the simplest to set up and use, so that’s what I’ll go through here.
Add SendGrid to your heroku app by running
heroku addons:add sendgrid:starter
Now SendGrid will have automatically generated a username and password that you can see by running
heroku config:get SENDGRID_USERNAMEheroku config:get SENDGRID_PASSWORD
or simply running
heroku config will show you all the heroku config variables.
Next, go to
config/environment/production.rb and add our email settings there:
So you can see that SendGrid has set up environment variables on heroku for us, giving us the SENDGRID_USERNAME and SENDGRID_PASSWORD. This is the same idea that we just did in development using the figaro gem.


Comments
Post a Comment